-
-
Recent Posts
Archives
Categories
- Books & Reading Materials (5)
- Exhibitions & Artists (25)
- General Arts (11)
- General fun pursuits (20)
- Image of the week (159)
- Museums, Galleries & Concerts (22)
- Musings (16)
- My Creative Pieces (369)
- Design Play (55)
- Elian and his world of fantasy (6)
- My books & journals (51)
- My drawing (54)
- My painting (23)
- My paper (40)
- My prints (192)
- Printmaking 1 (155)
- Textiles 1: Exploring Ideas (126)
- Uncategorized (123)
- Workshops & Classes (40)
Tag Archives: Printing
Project: Construction – Part 2
Following on from my previous solar plate prints I decided to create a relief linocut with the aim of masking and selectively inking specific areas to achieve colour and tonal variation. Using Photoshop I created a mock-up of what I … Continue reading
Posted in My Creative Pieces, My prints
Tagged lino print, Linocut, print-making, Printing, printmaking
4 Comments
Print group concertina swap
Every December our print group cut up either failed or excess prints produced during the year and swap with each other to create small concertina books. Our group is full of very experienced printmakers, most of whom specialize in specific … Continue reading
Posted in Design Play, General fun pursuits, My Creative Pieces, My prints
Tagged Printing
5 Comments
Abstracting a design
This week I’ve been building resources in my sketchbook. An A5 pencil sketch of TV remote controls sitting on my cutting mat was followed by a closer view of a specific area in Sharpie pen. I picked these as my … Continue reading
A little collagraph printing
Even though my Linear Containment book was fully completed and assembled earlier in the year I still have an itch to print the final plate in a different colourway and then perhaps stitch into it. The original print looked like … Continue reading
Posted in My Creative Pieces, My prints
Tagged Collagraphs, Linear Containment, Printing, printing plate
Leave a comment
Printing the new plate
Further to my last post, where I started creating my new collagraph plate (without the large cut away areas), once the Mod Podge solution dried I slashed into the plate surface, glued on some thin cardboard shapes and added some … Continue reading
Posted in My Creative Pieces, My prints
Tagged Collagraphs, Linear Containment, Printing, printing plate
2 Comments
Printing collagraphs: The next stage
In my last post I talked about the necessity of understanding the type of paper you’re using to print on, depending on the print method. So, seeing as I still need a few prints on lightweight paper, and I’m using … Continue reading
Posted in My Creative Pieces, My prints
Tagged Collagraphs, Linear Containment, Printing, printing plate
Leave a comment
The four ‘P’s of Printing
Loving my latest printing project although all is not going to plan. But isn’t that the beauty of printing? The serendipity of result when peeling back the printed sheet from the print plate? The unexpected joy or frustration at seeing … Continue reading
Posted in My Creative Pieces, My prints
Tagged Collagraphs, Linear Containment, Printing, printing plate
1 Comment
Lotus pods: Revisited
A couple of years ago, in a Jet James workshop, I made this print plate from 3mm foamex board (anyone following my blog will know by now that I love this stuff). Several techniques were used to create this intaglio/collagraph … Continue reading
Collagraph printing: Tree bark – a larger plate
Using my original collagraph plate (see previous posts) as a reference I started to plan a larger version with a little more complexity. The sand I adhered to the mountboard backing in my last, smaller piece didn’t quite give me … Continue reading
Collagraph printing: Tree bark
Continuing to play with the collagraph plate I made in the workshop with Gabriella Hegyes (see initial print left) I’ve been trying to get some variety in colour and outcome before I move to a larger, more complex, piece. When … Continue reading
Gabriella Hegyes: Printing from the Land (C)
Part 3: Collagraphs: The first thing I love about collagraphs is that there is so much you can do to create an image. I’ve done several workshops and experimented with a variety of media to create texture and patterning, but … Continue reading
Posted in General fun pursuits, My Creative Pieces, My prints
Tagged Printing, Tree Theme
Leave a comment
Gabriella Hegyes: Printing from the Land (B)
Part 2: Gabriella certainly worked us hard and shared a ton of information and samples with us. Trapping Plant Material: This was interesting. I had some very dry, flattened, plant material which was suitable to be trapped between gauze layers. … Continue reading
Gabriella Hegyes: Printing from the Land (A)
Part 1: This two-day workshop in the Blue Mountains was an opportunity for me to print in completely different ways to what I have experienced so far. Clay Printing: Starting with a block of potters clay each we rolled it … Continue reading
Uses for ‘failed’ prints.
No-one can produce perfect prints first time so what happens to all those trial pieces? The ones where the colour chosen really wasn’t right or the registration was off-kilter. Even the ones where the main image was perfect but the … Continue reading
Posted in My Creative Pieces, Textiles 1: Exploring Ideas, Workshops & Classes
Tagged EI-P4-Other, EI-P4-Sketchbook, Printing
1 Comment
Playing with printing
Although I’ve finished the screen printing assignment I’ve still been doing a bit for my own enjoyment. String resist. String resist back (which I particularly like). Gold printed base with yellow & orange overlay using shredded paper resist. Patterned base … Continue reading
Posted in My Creative Pieces, Textiles 1: Exploring Ideas
Tagged EI-P2-Other, Printing, Screen Print
Leave a comment
Assignment 2 – Review
There are no review questions at the end of this assignment so I’ll just make a few notes to keep as a reference for the future. What were the main differences between using fabric paints and dyes as a print … Continue reading
Assignment 2 – Drimarine K dye screen printing
Over the last week I’ve been preparing my  chemicals & fabrics for screen printing with thickened dyes. The first challenge was the thickened dye paste. I mixed the DR33 to a paste with methylated spirits as recommended and then started adding the chemical water. Oops, a nasty curdled mess happened very quickly. Note: I might add that I was top of my year in school for making cheese sauce from a roux base and I’m pretty good at mayonnaise as well.
So the whole lot got thrown into the blender and whizzed until smooth. Actually no, it wasn’t smooth. It had turned into twice its volume and was pure white foam. I had to wait 24 hours until it settled which was about when this photo was taken. Just a few surface bubbles remained. It was then measured out into takeaway containers and dye was added. 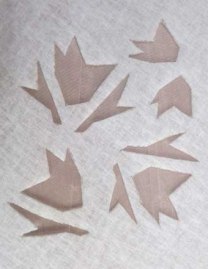
I then started working out a couple of designs on Vilene interfacing as stencils. One just has some areas cut away whilst the second has some acrylic painted areas as a resist, plus some cut out areas (photo done before areas have been cut out).
I also made some repairs to the two cold wax screens I used previously. When washing them some areas of wax had come away so I re-applied it so I could compare a print using this method with my other samples.
This was my initial colour trial to see how the thickened dye travelled across the screen. On the left is the wet dye, photo immediately after application whilst still wet, and on the right is after batching. A lot of colour loss.

I did multiple prints using the bars wax resist. I overlaid it several times and didn’t worry about any ghosting effect that might happen.
Again there has been quite significant colour loss resulting in the deep red turning more pink. With this method it is difficult to maintain crisp lines because I was working wet on wet – or damp on damp at least. My base yellow had to remain wet/damp so the soda ash would activate so you can see that the red lines have blurred and spread. After batching the thick calico I can see a huge difference between this and the fabric paint screen printing. The dyeing method is fully absorbed into the cloth and the colour has bled out a little. Quite a different result to the printing inks/paints.
I left the screen with the remainder of the red on it and overprinted a damp cool-yellow base in black.
Hmmm….OK. Interesting, I guess. The faint red ghosting has given a little depth to the piece I suppose. I’m not thrilled with it but that’s because my whole nature screams neat and precise so it’s not really my type of thing.
From here I moved to my cut Vilene stencil. The idea is to use a light colour first, reposition the screen and use a slightly darker or deeper colour and to keep on this way. Gradually the dyes saturate the Vilene and more colour comes through giving a variegated look to the print where the multiple colours have gradually worked their way into the fibre and finally out onto the cloth. Obviously the colour currently being worked with will fully fill the cut out motif area. The progressive results are below in the order the colours were applied. I didn’t get good coverage until right at the end and I think this was because my dyes were a little too thick so saturation took some time. I’m going to dilute the thickened paste for my next work.
 For these samples I used a white cotton with a tiny all-over white flower design.
I was interested to see if the design would disappear, be more lightly coloured or remain white (as I’m not sure how they colour an embossed design like this, so it may not take the dye). I feel that the pattern has enhanced the dyeing results and further down this post you can see where I have photographed the front and back of the final two prints to give an indication of the difference in effect.
The first piece, below left, was so boring that I repositioned the screen a little and overprinted with a tiny amount of orange hoping to cause a yellow shadow effect.


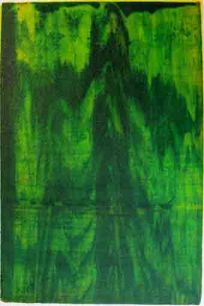 Finally I laid out a cool-yellow base and overprinted it with turquoise to make a variegated green.
  This one lost the most colour when washing out after batching and, just because I felt like it, I took a scourer and rubbed it to death to see just how much dye I could remove. Why? Purely for my own interest.
So far this has been a big learning experience, a lot of work and slightly unexpected results.
Posted in Textiles 1: Exploring Ideas
Tagged Dye, EI-P2-S2-S3, Printing, Resist dyeing, Screen printing, Wet-on-wet
2 Comments
Prints Charming – Screen Printing Workshop
All week I’ve been making chemical water, thickened paste, mixing dye colours and trialling my dye screen-printing. Today I took a time out from that while my prints are batching and attended another screen printing workshop.
 This one day event, run by Cath Derksema of Prints Charming, was a delight after my not-so-great experience a month ago elsewhere.
  Cath is an experienced printer and designer with a long history in the textiles industry. In the early ’90s she developed “Art Park” a multifaceted design studio designing prints for manufacturers including Seafolly, Billabong, Carla Zampatti, Table 8, Target and Woolworths (the Australian one, not UK).
  In 2002 she created “Prints Charming” selling into America and now locally through Spotlight.
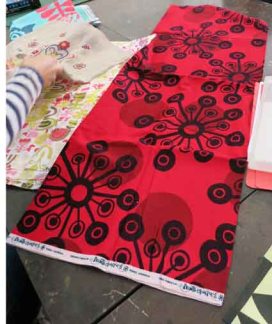
 A few of her currently available designs are featured here. Most of the samples she showed us were large crisp uncluttered images printed onto predyed fabric bases. I was particularly interested in looking at the same design printed in different colourways as per the two pictures above on the left.
The day was aimed at paper stencil cutting and overprinting. We were given white cotton, medium weight, around 1 x 1.5 metre to work on with several small sample pieces for us to use for initial trials.
Cath uses Aquatex fabric colours which come in concentrate form and are mixed with a clear bonder, or you could call it an extender, before use. This picture shows a few of the colours we could use because we had already made our initial choices and taken them to our workstations. There was certainly no shortage and we mixed other variations as we went.
 Cath cut a simple stencil and showed us how to apply it to fabric, how to correctly hold the squeegee, how much paint to use, how to get a good clear print and finally how to clean up. Her sample is to the left. I’ve not cropped it so you can see the wonderful array of prints she has happening on her drop cloth. Frankly there were enough ideas on that just to get us going!!
I had taken along some of the images I have been developing in my sketchbook for my assignment. They are fairly straight forward and easy to cut, not too involved for paper stencils and easily repeatable when they are saturated. However, if I were to do this again I would use my plastic paper instead of photocopy paper then I could wash my stencils for reuse because I quite liked them but they are now in the bin of course. Here is the piece I came home with:
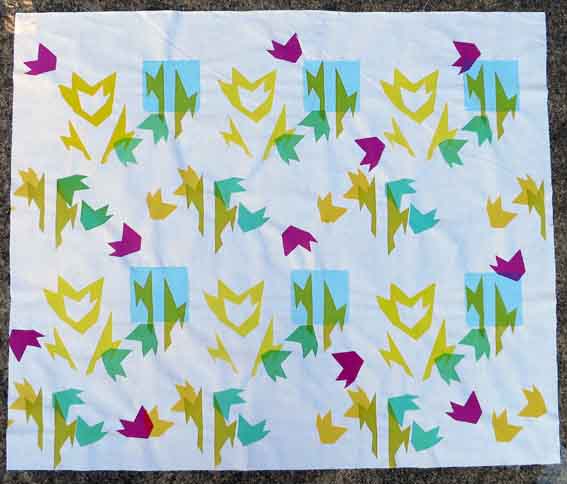 I’m extremely happy with what I learned today and the result I got. The print registration was done by eye alone, there was no measuring and I’ve done a set of 6 full repeats plus some partials. The only random part are the pink motifs which have been placed haphazardly where I felt so inclined to put them. This now needs to be heat set before using and I’m thinking of tea dyeing the whole thing afterwards as it seems a bit stark, but we’ll see.
Positives from the day:
- The chance to use yet another type of fabric paint and I’ve found I much prefer this brand to my Derivan ones. They are less ‘plastic’ looking and alter the hand of the fabric to a much lesser degree. I’m told that once they are heat set that reduces even further.
- Still on paint – it was terrific to see how easy it is to mix and ‘dilute’ colours to achieve very different effects.
- An opportunity to see how a professional prints, explore her method and see how that fits with the way I work.
- I learned that this process can be quite quick and fun and less laborious than I have currently been doing. So a change in my own practice will now be made.
- I was delighted to see the different stencil designs from each participant and how they built their surfaces. This has given me food for thought regarding my future work.
Negatives from the day:
- It’s over.
Resources:
http://www.dynamiccoatings.com.au – Aquatex fabric paints and mediums
www.printscharming.com.au Continue reading
Assignment 2 – Screen printing on paper
Each of the samples in the previous 2 posts were started by trials on paper. Much of the paper, depending on the thickness and quality, became distorted and the prints weren’t perfect. Some of this texture transferred to the base of the screen and came through on the fabric prints. It was easily erased by performing a second pull of paint over the surface but on print sample 2 (the blue pine cone shapes) I left the texture as I felt it added to the piece.
Here are some of the more interesting paper results.
Assignment 2 – Screen printing with wax resists
Printing ink samples using cold wax resists
One of the techniques the course manual suggests is to either spray paint or hand paint a design onto the screen mesh using acrylic paints and let it dry as a resist. The advantage is that the design will be permanent and it can be used over and over. As a beginner to screen printing I’m not sure about going down this route and possibly ruining a screen which will then have to be replaced for further sampling techniques. What design should I choose? What am I likely to want long-term? At this stage I don’t wish to commit to this idea. The cost of new screens and the lack of availability of screen printing supplies in my local area play a large part in my decision.
However, applying a design to the mesh itself instead of taping on a stencil or using cut-out resists appeals to me. So I have bought some liquid cold wax which can be painted directly on the mesh and should achieve a similar result to the paint resist except it is able to be removed later with hot water if required. Alternatively it can stay on the screen long term. At this stage of my development this technique has advantages over the acrylic paint option, in my view, for this very reason.
Print 7
 I started with a piece of calico I had previously dyed. During the dyeing process a skewer was used with deep purple dye to create random swirls.
Using a stencil I cut for some colour sampling back in A Creative Approach last year I painted the cold wax onto the screen mesh. I then free hand filled in some other areas to create an interesting print area. The wax dries quite quickly but I was unsure when it was ready because it continued to feel quite tacky. In the end I left it overnight to ensure it was properly set on the screen.
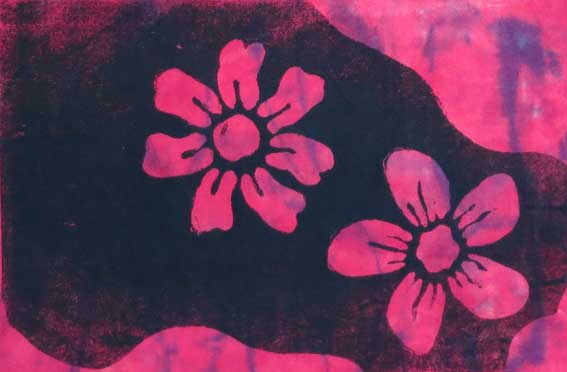 I didn’t want the print to be solid but I did want the colour difference to be dramatic, so I used black paint and put the bulk of the paint bead towards the centre top of the screen. This gave me a more solid centre, where the flowers are, with a lighter surround. It should be noted that the picture has been rotated anti-clockwise 90 degrees.
I felt the black was very harsh against the red and purple, so I did another print, without cleaning the screen, using purple. I also rotated the screen to get another design view. Again I kept the paint to a minimum so it would fade towards the edges.
 I prefer the purple, it isn’t quite so stark but I don’t see, on either sample, whether the printed area or the fabric is coming to the fore. Both prints look quite one dimensional and I think that is because the value of both print and fabric are equally as strong.
Print 8
 Here I used a previously dyed cloth. It is white cotton with a busy design created using multiple folding and 2 dyeing processes. The aim is to see how further patterning over this will result.
I went back to my prison bars/piano wire design from earlier in this assignment (here) and printed it out the same size as my screen print area. A folded towel with the picture on top sat inside the screen so I could follow the design outline when painting the wax onto the mesh. It’s surprisingly difficult to draw straight lines and keep within the pattern outline. I waxed in the negative space and left the bars so they would print.
 I’ve cropped the photo because the design is not enhanced with the excess unprinted material surround. Once I had the print down it looked so small so I rotated the screen and did another print adjoining the first. The saturated red really stands forward with the soft edges of the background fabric colours receding into the distance. There is some real depth to this piece and I feel I’m looking through the bars to what is behind.
Print 9
Using an old Indian woodblock as my template I applied orange wax crayon to the screen mesh in a similar manner to making a brass rubbing. I was hopeful that the crayon would provide enough of a resist to create a few prints before breaking down.
The woodblock has numerous flaws with small sections broken off so the initial rubbing reflected this. The print will of course come out in reverse.
I used my own dyed fabric, an orange muslin with a fairly open weave and a green/yellow dyed cotton similar to sheeting.
 Left: I started with a solid print which has come out quite well but there are a couple of small areas where the paint is a little light. When doing the initial wax rubbing some areas around the design picked up a light coating of wax and whilst this has not stopped the paint coming through but it has pushed the wax through the mesh with it. You can see slight amounts of orange crayon in parts. Right: Having reviewed the first print I felt it was a waste of my hand-dyed cloth to cover it completely with fabric paint so I applied some powder to the screen to break down the image a little.
Dark olive paint was used for these prints – golden yellow and black.
Without cleaning the screen I changed paint to the lovely brown I had left over from previous prints and tried that over the orange base. Not quite enough paint for a good coverage at the base but I like the effect. With the incomplete flower design and the lack of paint it has an aged, worn out appearance.
The pattern is much more prominent on this orange fabric using the brown rather than the previous one using the dark green.
I then decided to try a colour mix and added some orange to my brown bead puddle.
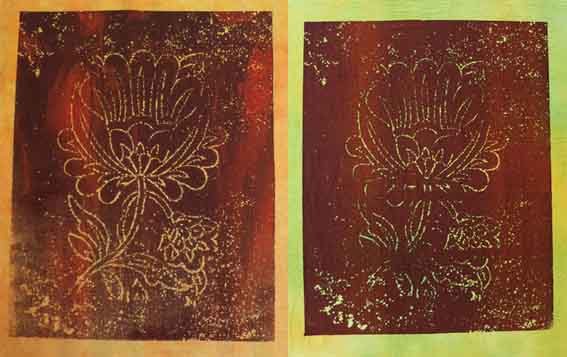 Left: I first printed on the orange fabric and I think the result has come out very well. The brown/red/orange mix of paint and fabric integrates into a warm and unified piece. There is less definition in the design and the crayon is already starting to disappear. Right: An experiment to see how the brown and orange paint looks on the green background. By this stage the wax crayon is really breaking down and the image is much less defined. However enough can be seen to gauge the colour effect, and I’m not keen on this sample. I think the dark green on the light green background is more effective.
So after all this sampling with the printing inks I feel that I have learned a lot. As I’ve progressed I’ve become better at assessing how much paint I need to use, my clean up routine is very orderly meaning I can get screens and squeegees back into action quickly, my fabric preparation (sizing, cutting, ironing and pinning in place) is now quite accurate which improves the results and my eye for colour is improving. My colour preferences are for either analogous colours or colours which are created from a similar base. This seems to give the prints more unification and less like paint that has just been plonked on to the surface of a fabric with no considered outcome.
Assignment 2 Preparation
Setting up the work area
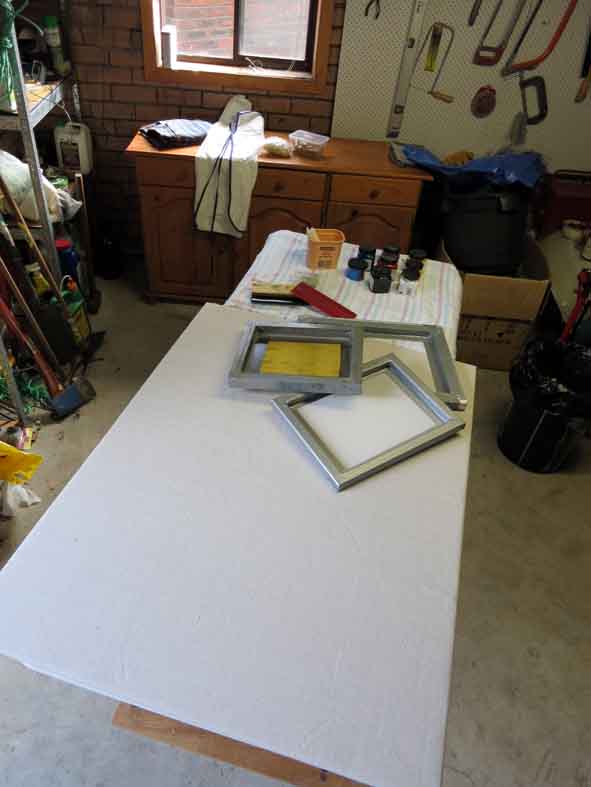 After consideration I’ve set up a dedicated print space in our outbuilding. It is the most suitable area because:
- Drips and spillages are easily cleaned off or absorbed by the concrete floor and the area can be hosed if need be. No danger of damaging any floor coverings in the house.
- Large concrete drying area outside the shed.
- Huge laundry sink within 4 metres.
- Hose and garden area to clean screens.
- Sunny aspect outside to dry items including washing line to hang prints.
- Electrical outlets for hairdryer (if it’s a wet day and things won’t dry).
- Undercover but still open air.
- Large enough space to move around the print table.
- Cupboard space and worktop to keep supplies.
My print pad/surface is plyboard covered with 2 layers of acrylic felt and a plastic backed drop cloth – all stapled as a permanent surface. This is finally overlaid with a double layer of flannelette sheet (removable and washable). The plyboard measures 120 x 90cm giving me enough space to pin out 6 fabric pieces at a time, all around A3 size.
I have a mix of frames, two wood and one aluminium, each prepared with duct tape (fully covered for the wooden ones, partially covered for the aluminium one) and with a well. All have polyester mesh 43T. I have three squeegees: one Speedball plastic ‘paddle’ style and two with a wooden handle.
My experimentation starts by using Derivan Screen Printing Inks. Continue reading
Posted in Textiles 1: Exploring Ideas
Tagged EI-P2-Preparation, Printing, Screen printing
Leave a comment
Screen Printing Workshop
I’ve been reading up on screen printing and collecting materials for my current assignment. I did a two day course about 4 years ago but have forgotten pretty much most of what we did so thought I would do a one day refresher. It was certainly an eye-opener. Some aspects were very interesting and informative whilst other parts were pretty abysmal, but they clearly demonstrated some of the dos and don’ts of the process.
Positives:
- A bound folder of comprehensive notes detailing 17 different resist and pattern making techniques.
- The opportunity to see and try some of the above techniques with a tutor advising.
- Each participant wanted to print for different reasons and on different surfaces so a wide variety of questions were asked and answered, a lot of which would not have occurred to me working alone at home.
- An explanation of the slightly padded printing board/surface – even though we weren’t allowed to use the one there and worked on folded towels.
Negatives:
- Disorganised, unprepared and products not readily to hand.
- Old and unprepared wooden frames. These had not been either varnished or protected by any tape so the main one we were using had slightly warped. Insufficient frames for one per person (there were 7 of us) so we all used the same one in rotation for each technique.
- Tutor admitted frames were not routinely cleaned in a timely manner so the meshes were stained making it difficult to see through for accurate placement. There were also a couple of small holes/tears in one of the meshes.
- Fabric paints were old, end of tubs, and tutor commented that she wished to use up old stock. Paints had separated and were ‘moussy’ indicating they were coming to the end of their usable life (tutor’s words). Colour palette limited to green, red, blue and a smidge of old globular yellow.
- No layering process covered.
- No information re blended colour or using multiple colours together.
- Fabrics were not pinned or secured in place during printing so multiple people had to help out for each print.
Whilst this sounds pretty poor it did provide a lot of knowledge concerning what can be done better and I’ve prepared my equipment and set my work space up accordingly. Here are my results from the day:
 Powder resist – Left: on paper with the only bit of yellow we had. Right: on thick textural cotton fabric. Due to the speckled appearance I think this technique has a lot of scope for layering on top of other prints.
 Foliage & masking tape resist – Left: plant foliage used over calico fabric. Right: masking tape adhered to screen with overlay of plant resist print. I tried the green print twice as it simply wouldn’t work. There was speculation that the paint had dried on the screen.
 Multiple resists – Left: paper, foliage & lace motif resists. Right: various wax resists.
And that’s it for a 3 hour car journey in each direction and 6 hours tuition!!!!!
What I’ve learned:
- Preparing frames correctly will increase their usable life-span and paint cleans off duct tape much easier than off porous wood.
- Clean frames immediately after use.
- Stir/mix paints well before use and ensure they are still usable.
- Prepare a large print work surface where either multiple small pieces of fabric can be pinned out or a larger piece can be worked on.
- Have a water source nearby and a hose if possible.
- Have a hanging or drying area nearby as each piece needs space to dry out, preferably flat initially.
Other points:
- This workshop used block printing ink. My local art shop tells me that this is designed for paper and dries out too quickly for screen printing. They suggest using screen printing inks (sounds logical to me) as they have a slight retardant in them to avoid this problem. The workshop tutor didn’t know the difference between these two products. I wonder if this is the reason my prints are so poor or was the folded towel base too soft?
I’m starting my own experimentation with Derivan screen printing inks before moving to thickened Drimarine K dyes.
I have another one day screen printing workshop at the end of May and I’m looking forward to seeing how it differs from this experience.
Posted in Textiles 1: Exploring Ideas, Workshops & Classes
Tagged EI-P2-Other, Ink, Printing, Screen Print, Screen printing
2 Comments


