After my printing disaster yesterday I had some ink left to use. Over the past few months I’ve read quite a bit about the use of carborundum on print plates. Carborundum is a very fine powder made from silicon carbide, fused alumina and other compounds. It is used to create the surface of emery boards and sandpaper.
As I understand it, you adhere it to a base surface and when inked up it produces a deep velvety colour. Even before starting I had my doubts. I’ve tried inking up sandpaper in the past and it simply doesn’t work well, if at all. I’ve also tried printing on it, which was a dismal failure.
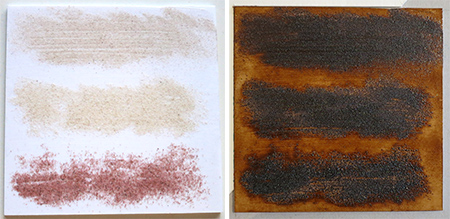
I was unable to buy carborundum as it was out of stock so I took pumice (very fine), sand (fine) and crushed garnet (coarse) instead. I applied impasto gel medium to foamex board and sprinkled it liberally with the three products and let it dry. I shook off the excess and gave it another quick coating of medium (should have taken more care at this stage).
 Above left: top to bottom – pumice, sand, garnet. Right: the inked up plate.
I was right. There was no way the textural surfaces would take the ink from the roller so I stippled it with a brush. I now know why: my ‘quick coating’ of medium over the grounds wasn’t thick enough and it hadn’t sealed the granules in. So, guess what? Despite the removal of every single loose particle of the three materials some of them (actually a lot of them) stuck to the tacky ink on the roller and I ended up with what appeared to be a very large, fat unlit sparkler!!
And I’d just spent an hour cleaning Mod Podge off it from my last mishap!! Fun day.
Well, might as well print it anyway.
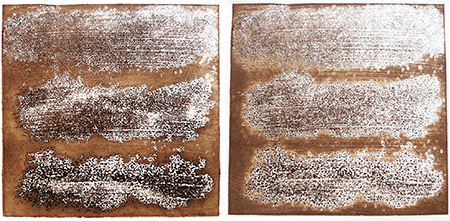
 I got about what I expected from the two prints.
So what went wrong? Why didn’t I get the solid dark areas I’ve read about? Well, I made a lot of mistakes:
- Rolling ink on is a definite NO. The fine carborundum particles sit very closely together suspended in whatever medium you’ve used to adhere them to your base board. There are millions of miniscule peaks and troughs within their cluster. The idea is that when you apply ink to the surface it fills up the crevices/troughs so an abundance of ink is captured on the print plate. When this is transferred to paper the ink within these spaces is compressed and forced onto the paper, spreads out and forms an even layer. Because more ink has been captured in the crevices than on a normal flat inked surface the transfer has a very high colour density. So the ink needs to be brushed onto the surface. Makes perfect sense now I’ve analyzed it.
- I mixed my ink with extender and a couple of drops of burnt plate oil. It was a good consistency for printing from a roller, not good for the carborundum technique (in hindsight – with my vast experience of this!). To allow the ink to sink into the textured surface it needs to be ‘wetter’, i.e. more liquid. Mine sat on the upper surface and I stipple-brushed it into the recesses where it sat but didn’t ‘pool’ enough to fill the pits. Hence no solid transfer.
- The carborundum needs to be securely sealed in place. It’s an abrasive product so even if you successfully take into account the above information you also need to keep in mind that it is not a surface that ink naturally bonds with. So even though I adhered it to my base correctly, I didn’t sufficiently seal the surface of the particles once the initial coating was dry. Tacky oil based inks roll and brush onto many slick surfaces quite well: glues, mediums, plastic, lino, smooth wood, varnish, shellac and so on, but they don’t attach themselves to minute gritty particles. There’s simply no ‘grab’. So my quick, thin, approximate surface sealing wasn’t good enough. Where’s the proof? Well, that’s easy – I ended up with a grit covered roller and no ink on the plate!
This was my first attempt at this textural approach and although the results were not successful I’ve got a better idea of how it works. Now I’ve got to repair the plate, reseal it and let it dry for a few days before having another go. Next time I’ll make sure it’s 100% sealed and the ink will be transferred to the print plate by brush.
Yesterday was a very long day.

Bummer! Sometimes we have weeks like this…. And then it all comes together and it’s bliss.
I’m hoping the latter part of your comment will be the case today!! Fingers crossed.
What a painful couple of days! There are so many products available to print-makers, and it seems even more pitfalls. I’m glad you and the roller have emerged intact from the experience.
Yes,, it’s all about the rollers – don’t ruin the rollers.
Thinking back, I can appreciate how funny it was in a way. My face must have been a picture, I was so horrified – and not only once either. I practically stopped breathing when looking at my sparkling crushed garnet coated roller. Never thought I could get it clean without destroying it. Let’s see how it rolls today.