 I started by resizing my design as there is quite a bit of fine line work and if the piece is too small I won’t be able to form the detail I am aiming for, the lino will simply crumble away. By enlarging it I can create thicker lines. It’s still going to be a challenge cutting back the final layer to form the black outlines and heaven help me when I get to the registration. Still, never been one to shy away from a challenge ……. and maybe misalignment will add another dimension.
The final lino size is now 25.7 x 20cm (10 1/4″ x 7 3/4″). Why this precise? My largest roller is 8″ (around 21cm) so it will be able to cover the lino fully in one direction without the possibility of leaving any overlay lines.
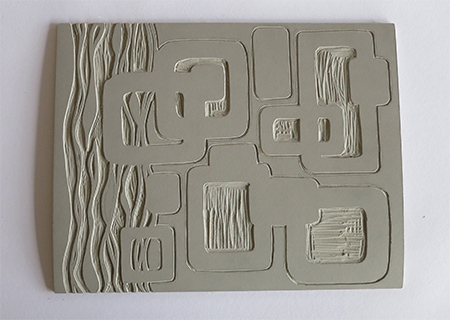
 It doesn’t look that complex at this stage but I had to think carefully about how to cut. The thin cut lines around the shapes is where the white outline will be and I wanted this fairly fine but still prominent.
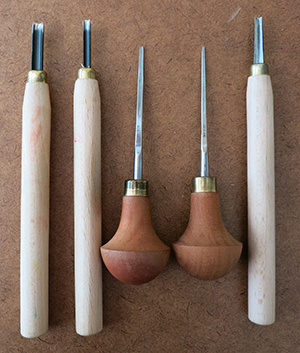
 I had hoped to do this part using a reasonably small V cut tool (on the right in the picture). However, after some practising I found that it is quite a hard tool to use, having tried it in the past with the same results. It has to be dug into the lino fairly deeply and then kept at a constant depth so the line you carve remains a constant width.
You would think that it wouldn’t be any harder than using the curved tools and that the same method applies (see the 2 tools on the left of the photo) and it does, in a way. The curved tools don’t have to go so deep and so cutting the surface seems easier. They glide shallowly and then further cuts can be made deeper within the same area without too much of a problem. With the V tool you really have to get it right first time and on something as precise as this piece I couldn’t guarantee to maintain the correct pressure and depth.
I have completely fallen in love with the 1mm cutter with the ball handle (middle cutter) and used this to dig my first outline for each area. It wasn’t quite wide enough to make a good edge around the shapes so I simply went around them all twice and took out any tiny areas where I hadn’t quite made it straight or wide enough. It’s given a really good outline and I’m confident I will get the look I’m after.
The larger central portions and the wavy lines were first outlined with the 1mm cutter and then the remainder was gouged out with either the curved cutters or the smaller .5mm cutter for the fine points.
It’s amazing that this new piece of lino is already bowed and doesn’t lie flat. I see this as a major flaw in the product (and a pain in the neck frankly) but will have to try to bend it forwards before each print in the hope it will remain flat for long enough when I come to future layers where registration is everything.
Can’t seem to get my head around simplification and large blocked areas. My designs veer towards small interlocking areas that need absolutely accurate placement.
OK, let’s give it a go.
