
Yes, that’s right, I’ve had another go at it even though I said I was moving on. I can’t seem to let it go until I’ve figured out how to get these prints right – and I’ve finally done it.
A few days ago I had a private printing lesson in my home, on my equipment, with Tony Ameniero. I attended one of his recent monoprinting classes and was impressed with his patience, expertise and teaching methods, so I bit the bullet and asked him to help me out with a bit of one-on-one advice. Obviously this isn’t something that I can afford often but the time he was with me was worth every cent.
I breathed a heavy sigh of relief when he examined my equipment, tools and products as he was very enthusiastic over my new rollers, the extender medium, the ink brands and my small print press.  However, I saw his eyes light up at the sight of my beautiful newly acquired book press. This was to be the highlight of our day.
He explained many technical aspects to printing, some of which I had worked out for myself but didn’t know how to rectify. The main crux of our initial discussion was how to pull a good lino print and it was here that I realised that my roller print press (etching press) just isn’t set up for this. The relief of the lino (i.e. depth) is too great to allow the roller to comfortably do its job. There are two rollers, one under the base plate and the other on the top side which rolls over the print media, so transferring the image. The handle which operates the machine only causes the underside roller to turn so if the top roller has no initial pressure on the base plate then nothing moves because it doesn’t ‘grab’ the base plate.
Why wouldn’t the top roller sit fairly tightly on top of the base plate and so grab and turn as the bottom roller does? Well, the top roller has to be raised a little so it can roll across the carved lino and paper – which is around 5mm deep. And there we have the first problem. In addition, the roller bumps the edge of the lino as it reaches it and even if it moves a fraction you will get bad registration. After having (hopefully) managed a first print it’s not possible to trap the paper in place, flip it up and put the next lino down accurately because as the roller isn’t tight against the base plate the paper isn’t held tightly either and will almost certainly move – along with the roller bump as it goes over the second cut lino of course.
OK, I’ve got it. What’s the answer? The book press, of course.
We also looked at a slightly different registration set-up to the several types I’ve been using. So we made a new one and it’s superb and is working well.
 Mount board was cut slightly larger than the paper size I wish to print on. The lino size was marked in the centre (or wherever you wish to print) and mount board corner cut-outs were double-sided taped into place, snuggly fitting the lino. Yes, you need to have cut multiple lino pieces to exactly the same size or they won’t fit into the well. Mylar tabs were taped to the top and side, as shown. When the paper is carefully pushed into the tabs and laid over the lino it cannot move. Once pressure is applied – either through a roller press or book press – the tabs flatten and hold the paper in place. Brilliant and simple. This system ensures you always put the paper back in exactly the same spot and it can’t shift.
 Above clockwise from top left: Paper fitted into tabs and lightly hand pressed over lino to hold in place. Blanket over paper. Cardboard over the blanket, now ready to go into the book press.
Herewith three prints made using this system:
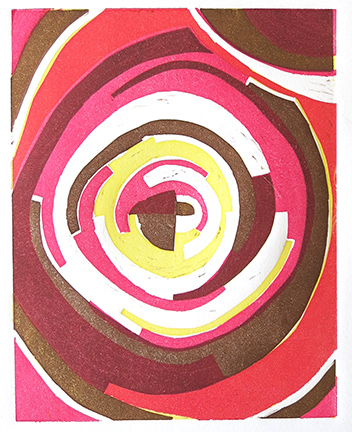 Above: Arches 88 paper, dry. Chrome yellow hue oil colour, quinacridone red and sepia oil based inks, all mixed 50% with extender medium. The registration is good on three sides but you can see that the sepia lino piece has been cut slightly smaller than the other two pieces, so there is a mismatch on the right hand side. If it was exactly the same size it would have been brilliant.
 Above: An identical print to the first one but without rolling out more inks, so the print has a lighter look to it. The extender medium has a drying agent in it so second prints are always a little lighter as the ink is slightly drier. This can be avoided by cleaning the glass print preparation area and rolling out new ink each time. I also pushed the lino slightly to the right to avoid too much obvious mismatch.
 Above: Kozo extra heavy paper with the same colour mix but freshly rolled. You can see a slight indentation around the print where the press pressure has been affected by the corner tabs holding the lino in place. This is because the lino is around 5mm in depth and my tabs are 4mm, so I can avoid it by using tabs only 3mm deep in future.
The first two prints show a little sepia print interference where the ink caught the lino in the cut areas which I didn’t notice but Tony had told me that this isn’t always a bad thing. It forms a unique print. On the third print I made sure it was spotless. However, having been looking at them for a few days I’ve decided he’s right, and I quite like this bit of random marking here and there. So far I’ve spent my time ensuring every print doesn’t have that but maybe I’m being too precise and I should let things be a little more natural. If a mark comes through then so be it and let’s hope it adds to the overall composition.

Pingback: Print 1. Assignment 2: First relief prints | TactualTextiles
Pingback: Print 1. Project 8: Finalising the design | TactualTextiles